Posts

Slump Test!! Types of concrete Slump

Image
Slump refers to the consistency or workability of the concrete mixture. The slump test is a standard test used to measure the consistency of fresh concrete before it sets. Based on the result of this test, concrete can be classified into different types of slumps. Here are the common types: True Slump: In a true slump, the concrete simply subsides or settles evenly, maintaining a roughly symmetrical shape. This indicates a good level of workability and cohesion in the concrete mix, making it suitable for a wide range of applications, including flatwork and general construction. Shear Slump: In a shear slump, one side of the concrete mass shears off and slips sideways, resulting in an asymmetrical shape. This type of slump often indicates that the concrete mix is too wet or has poor cohesion, which can compromise its strength and durability. Types of Slump Collapse Slump: A collapse slump occurs when the concrete collapses completely and flows outwards, losing its shape almost entire...

Why Concrete Cubes shows greater strength than cylinder?

Image
Concrete cubes typically exhibit higher compressive strength compared to cylinders at 28 days due to a few factors: Shape Effect: Cubes tend to distribute stress more evenly than cylinders. The corners of cubes experience higher stress concentrations, which can lead to higher ultimate strength compared to cylinders. Additionally, the failure plane in cubes is often through the center, which is a more direct path compared to the inclined failure plane in cylinders. Sample Preparation: Cubes are easier to manufacture and handle during casting and curing, resulting in more consistent and uniform specimens. Cylinders, on the other hand, are more prone to variations in casting and curing conditions, leading to potential differences in strength. Concrete cube and cylinders Surface Area-to-Volume Ratio: Cubes have a smaller surface area-to-volume ratio compared to cylinders of the same volume. This means cubes lose less moisture during curing, resulting in better hydration and potentially ...

Different types of Bitumen test in construction

Image
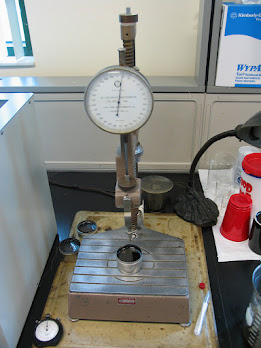
  Bitumen, a crucial component in road construction and other infrastructure projects, undergoes various tests to ensure its quality and suitability for specific applications. Here are some common types of bitumen tests conducted in construction projects: Penetration Test: Measures the hardness or softness of bitumen. Involves measuring the depth (in tenths of a millimeter) to which a standard needle penetrates the bitumen sample under specific conditions of loading, time, and temperature. Penetration Test Softening Point Test: Determines the temperature at which bitumen softens. The softening point is the temperature at which a bitumen sample can no longer support the weight of a steel ball under specified conditions. Ductility Test: Measures the bitumen's ability to deform without breaking. Involves measuring the elongation of a standard briquette of bitumen at a specific temperature and pull rate. Ductility Test Flash and Fire Point Test: Determines the temperature at which bitu...

Importance of Tremie Concreting for Underwater concreting !!

Image
Importance of Tremie Concreting for Underwater concreting !!   Tremie concrete is commonly used in bored piling or drilled shaft construction to place concrete underwater or in situations where the concrete needs to be introduced from the bottom up. Using a tremie pipe in this process helps ensure the quality and integrity of the concrete within the drilled shaft. Here are the reasons why tremie pipe concrete is required in bored piling, along with some tremie concrete specifications: Why Tremie Pipe Concrete is Required: Prevents Segregation: When placing concrete in a deep borehole, the free fall of concrete from the top can lead to segregation, where the aggregates separate from the cement paste. This can result in a weakened and less durable concrete. Tremie concreting. Minimizes Water Intrusion: In situations where the borehole is filled with water or where the groundwater level is high, a tremie pipe allows concrete to be placed while minimizing the risk of water intrusion....

ইট সংক্রান্ত কিছু তথ্য

Image
 ইটঃ ইট কন্সট্রাকশনে অতি দরকারি একটি উপকরণ। ইট বলতে আমরা পাথর সদৃশ,মাটি পুড়িয়ে পাওয়া বস্তু কেই বুঝাই। ভাল ইট হতে হলে তাকে শক্ত, যথাযথ পোরানো , হোমোজিনিয়াস টেক্সচার, ইউনিফর্ম সাইজ, ক্র্যাক বিহীন  এর হতে হবে সেই সাথে এর রঙ কেও যথাযথ হতে হবে। ফাস্টক্লাস ইটের রঙ সাধারণত গাড় লালচে বা তামাটে হয়ে থাকে। ভাল ইটকে পরস্পর আঘাত করলে মেটালিক সাউন্ড হয়ে থাকে।  যার সারফেসে ষ্টীল নেইল দ্বারা দাগ কাটলে কোন পার্মানেন্ট দাগ পরে না।  চিত্রঃ ইট গড়ে ১২ টি ইটের কম্প্রেসিভ স্ত্রেন্থ মিনিমাম 170 kg/cm^2 বা 2400 psi হতে হবে। আর একটি মাত্র ইট নিয়ে কম্প্রেসিভ স্ট্রেন্থ টেস্ট করলেও মিনিমাম 140 kg/cm^2  বা 2000 psi হতে হবে। ইটের পানি শোষণ ক্ষমতা সরবোচ্চ  ইটের শুষ্ক ওজনের ১৫% পর্যন্ত হতে পারবে। ইটে ইফ্লরোসেন্স থাকা যাবে না। প্রয়জনে স্যালাইনিটি টেস্ট করিয়ে নিতে হবে।  বাংলাদেশের প্রেক্ষিতে ইটের আদর্শ সাইজ (+/- 3 mm): 240 mm,170 mm & 70 mm ইটের কিছু ফিল্ড টেস্ট যার মাধ্যমে সাইটেই ইটের সম্পর্কে ধারনা করা যাবে। মারকিং টেস্ট  ঃ  ইটের গায়ে নখের মাধ্যমে দাগ কাটার চেষ্টা করলে য...

400W, 500W,600W TMT bar এগুলোর মানে কি?

Image
বিভিন্ন ভাইভা তে প্রায় একটা কমন প্রশ্ন খেয়াল করা যায়। রিবার নিয়ে প্রশ্ন আসলেই জিজ্ঞাসা করা হয় 400W, 500W,600W TMT এগুলোর অর্থ কি? চলুন জেনে নেই।  প্রথমত W বলতে এখানে ওয়েল্ডইবিলিটি বোঝায়। অর্থাৎ এই বার গুলো কে ওয়েল্ডিং এর মাধ্যমে জোড়া লাগানো যায়। এবার আসি এই সংখ্যা গুলোর অর্থ। কোন রিবার 400W বলতে বোঝায় হল, ওয়েল্ড যোগ্য এই রিবারের yield স্ট্রেন্থ 400Mpa বা ৪০০ মেগা প্যাস্কেল। যেহেতু আমরা জানি, 1Mpa = 145 Psi. তাই 400W= 400Mpa/ (400x145)=58000 Psi/58 Ksi.বা 60 grade. ঠিক তেমনি কোন রিবার 500W বলতে বোঝায় হল, ওয়েল্ড যোগ্য এই রিবারের yeld স্ট্রেন্থ 500Mpa বা ৫০০ মেগা প্যাস্কেল। তাই 500W= 500Mpa/ (500x145)=72500 Psi/72.5 Ksi. আবার, 600W বলতে বোঝায় হল, ওয়েল্ড যোগ্য এই রিবারের yeld স্ট্রেন্থ 600Mpa বা ৬০০ মেগা প্যাস্কেল। তাই 600W= 600Mpa/ (600x145)=87000 Psi/87 Ksi.   এবার আসি, TMT বলতে কি বোঝায়? অনেক সময় ই রড কোম্পানি গুলকে বলতে শোনা যায়, 500W TMT bar, 600W TMT bar. TMT অর্থ হল thermo mechanically treated.অর্থাৎ, ওই বার টি thermo mechanical process এ ট্রিটমেন্ট করার পর প্র...

কন্সট্রাকশন জয়েন্ট এর ক্ষেত্রে করনীয়

Image
 কাজ করতে যেয়ে আমাদের অনেকসময় ই বীম এবং ছাদের ক্ষেত্রে কন্সট্রাকশন জয়েন্ট রাখার প্রয়োজন হয়। তবে সেক্ষেত্রে দেখা যায় অনেকসময় ই অজ্ঞতার কারণে ভুল হয়ে যায়। যেমন অনেকেই বীমের ক্ষেত্রে বীমের রড ছেড়ে দিয়ে  কলামের গা ঘেঁষে কন্সট্রাকশন জয়েন্ট রাখেন আবার ছাদের ক্ষেত্রে দেখা যায়, বীমের পরপরই ছাদের রড ছেড়ে কাস্টিং শেষ করে দেন যা করা কখনোই উচিত নয়। চিত্রঃ কন্সট্রাকশন জয়েন্ট  ১।  ছাদ বা বীমের ক্ষেত্রে কন্সট্রাকশন জয়েন্ট কখনোই স্লোপে রাখা যাবে না। কেননা স্লোপে রাখলে স্লোপের নিচের অংশে লুজ কংক্রিটের ্জন্য স্ট্রেন্থ অনেক কমে যায়।  ২। কন্সট্রাকশন জয়েন্ট সবসময় খাড়া রাখা উচিত। এবং শিয়ার কি রাখার প্র্যাকটিস সব থেকে ভাল। শিয়ার কি রাখার জন্য গর্ত বা গ্রুভ রেখে দেওয়া হয়। ৩। কন্সট্রাকশন জয়েন্ট সবসময় 2L/3 অর্থাৎ মধ্য তৃতীয় অংশে রাখতে হবে। যেহেতু এই জোন এ শিয়ার স্ট্রেস সব থেকে কম হয়ে থাকে। ৪। কন্সট্রাকশন জয়েন্ট কখনোই প্রথম বা শেষ L/3 অংশে রাখা যাবে না।  চিত্রঃ কন্সট্রাকশন জয়েন্ট এ ওয়াটার স্টপার ৫। যেহেতু কন্সট্রাকশন জয়েন্ট এ সবসময় পানি লিকেজ এর সম্ভাবনা বেশি থাকে তাই এখানে...